前两天在hacker news看到有人尝试用python构建一个简单的tcp stack,里面为了绕过内核的干扰而采用了ARP spoofing这种奇葩的方式。然后评论里有人说是因为作者没有使用raw socket的缘故。
Raw socket允许用户自定义tcp/ip数据包的header,赋予用户创建自定义数据包的能力,不使用底层操作系统生成的header。一般程序很少用到此项技术,主要是一些网络安全相关的软件,比如firewall、sniffer、port scanner会使用。Linux下有socket api提供raw socket的支持,windows下就比较悲剧了。抱着玩玩的心态,尝试了一下用python实现一个raw socket通信,顺便温习下tcp/ip。感谢Silver Moon的一篇精彩易懂的文章,是本文的主要参考资料。
首先是一点基础概念。
IP header的结构由RFC 791定义,如图(第一行每个数字代表一个bit位):
    0 1 2 3 4 5 6 7 8 9 0 1 2 3 4 5 6 7 8 9 0 1 2 3 4 5 6 7 8 9 0 1
   +-+-+-+-+-+-+-+-+-+-+-+-+-+-+-+-+-+-+-+-+-+-+-+-+-+-+-+-+-+-+-+-+
   |Version|  IHL  |Type of Service|          Total Length         |
   +-+-+-+-+-+-+-+-+-+-+-+-+-+-+-+-+-+-+-+-+-+-+-+-+-+-+-+-+-+-+-+-+
   |         Identification        |Flags|      Fragment Offset    |
   +-+-+-+-+-+-+-+-+-+-+-+-+-+-+-+-+-+-+-+-+-+-+-+-+-+-+-+-+-+-+-+-+
   |  Time to Live |    Protocol   |         Header Checksum       |
   +-+-+-+-+-+-+-+-+-+-+-+-+-+-+-+-+-+-+-+-+-+-+-+-+-+-+-+-+-+-+-+-+
   |                       Source Address                          |
   +-+-+-+-+-+-+-+-+-+-+-+-+-+-+-+-+-+-+-+-+-+-+-+-+-+-+-+-+-+-+-+-+
   |                    Destination Address                        |
   +-+-+-+-+-+-+-+-+-+-+-+-+-+-+-+-+-+-+-+-+-+-+-+-+-+-+-+-+-+-+-+-+
   |                    Options                    |    Padding    |
   +-+-+-+-+-+-+-+-+-+-+-+-+-+-+-+-+-+-+-+-+-+-+-+-+-+-+-+-+-+-+-+-+
然后TCP header的结构是由RFC 793定义的:
    0 1 2 3 4 5 6 7 8 9 0 1 2 3 4 5 6 7 8 9 0 1 2 3 4 5 6 7 8 9 0 1
   +-+-+-+-+-+-+-+-+-+-+-+-+-+-+-+-+-+-+-+-+-+-+-+-+-+-+-+-+-+-+-+-+
   |          Source Port          |       Destination Port        |
   +-+-+-+-+-+-+-+-+-+-+-+-+-+-+-+-+-+-+-+-+-+-+-+-+-+-+-+-+-+-+-+-+
   |                        Sequence Number                        |
   +-+-+-+-+-+-+-+-+-+-+-+-+-+-+-+-+-+-+-+-+-+-+-+-+-+-+-+-+-+-+-+-+
   |                    Acknowledgment Number                      |
   +-+-+-+-+-+-+-+-+-+-+-+-+-+-+-+-+-+-+-+-+-+-+-+-+-+-+-+-+-+-+-+-+
   |  Data |           |U|A|P|R|S|F|                               |
   | Offset| Reserved  |R|C|S|S|Y|I|            Window             |
   |       |           |G|K|H|T|N|N|                               |
   +-+-+-+-+-+-+-+-+-+-+-+-+-+-+-+-+-+-+-+-+-+-+-+-+-+-+-+-+-+-+-+-+
   |           Checksum            |         Urgent Pointer        |
   +-+-+-+-+-+-+-+-+-+-+-+-+-+-+-+-+-+-+-+-+-+-+-+-+-+-+-+-+-+-+-+-+
   |                    Options                    |    Padding    |
   +-+-+-+-+-+-+-+-+-+-+-+-+-+-+-+-+-+-+-+-+-+-+-+-+-+-+-+-+-+-+-+-+
而一个tcp/ip数据包是由ip header + tcp header + data(optional)组成的。
下面开工!
Python下创建一个raw socket:
try:
	s = socket.socket(socket.AF_INET, socket.SOCK_RAW, socket.IPPROTO_RAW)
except socket.error , msg:
	print 'Socket could not be created. Error Code : ' + str(msg[0]) + ' Message ' + msg[1]
	sys.exit()
注意这里使用了SOCK_RAW,而不是SOCK_STREAM或者SOCK_DGRAM。前者允许你操作header和data部分,后面俩只能访问到data部分。
raw socket通道构建好了,下面就开始构建需要发送的packet。
首先是ip header:
ip_source = '10.0.2.15' #本机IP
ip_dest = '64.4.11.42'	#也可以用域名:socket.gethostbyname('www.microsoft.com')

#填写ip header
ip_ver = 4			# ipv4
ip_ihl = 5			# Header Length =5, 表示无options部分
ip_dscp = 0			# 以前叫tos,现在叫dscp
ip_total_len = 0		# left for kernel to fill
ip_id = 22222			# fragment相关,随便写个
ip_frag_offset = 0		# fragment相关
ip_ttl = 255			# *nix下TTL一般是255
ip_protocol = socket.IPPROTO_TCP	# 表示后面接的是tcp数据
ip_checksum = 0			# left for kernel to fill
ip_saddr = socket.inet_pton(socket.AF_INET, ip_source)	# 两边的ip地址
ip_daddr = socket.inet_pton(socket.AF_INET, ip_dest)

ip_ver_ihl = (ip_ver << 4) + ip_ihl	# 俩4-bit数据合并成一个字节

# 按上面描述的结构,构建ip header。python library docs里面有句话挺有意思:
# The form '!' is available for those poor souls who claim they can't
# remember whether network byte order is big-endian or little-endian.
ip_header = pack('!BBHHHBBH4s4s' , ip_ver_ihl, ip_dscp, ip_total_len, ip_id, ip_frag_offset, ip_ttl, ip_protocol, ip_checksum, ip_saddr, ip_daddr)
然后接着是tcp header:
tcp_sport = 1000	# source port
tcp_dport = 80		# destination port
tcp_seq = 19890604	# 32-bit sequence number,这里随便指定个
tcp_ack_seq = 0		# 32-bit ACK number。这里不准备构建ack包,故设为0
tcp_data_offset = 5	# 和ip header一样,没option field
# 下面是各种tcp flags
tcp_flag_urg = 0	# 设成1的话,电信能让我家网络快点吗 >_<
tcp_flag_ack = 0
tcp_flag_psh = 0
tcp_flag_rst = 0	# "Network connection is reset"  熟悉吧?
tcp_flag_syn = 1
tcp_flag_fin = 0

tcp_window_size = 3000	# 据说只有自己写出一个拥堵算法,才算真正理解了tcp
tcp_checksum = 0	# 这个checksum不能靠kernel了,得自己算。先填个零在这放着
tcp_urgent_ptr = 0

# 继续合并small fields
tcp_offset_reserv = (tcp_data_offset << 4)
tcp_flags = tcp_flag_fin + (tcp_flag_syn << 1) + (tcp_flag_rst << 2) + (tcp_flag_psh <<3) + (tcp_ack_flag << 4) + (tcp_flag_urg << 5)

#按上面描述的结构,构建tcp header。
tcp_header = pack('!HHLLBBHHH' , tcp_sport, tcp_dport, tcp_seq, tcp_ack_seq, tcp_offset_reserv, tcp_flags, tcp_window_size, tcp_checksum, tcp_urgent_ptr)
至此,TCP/IP headers的构建已经基本完成。接着编写tcp checksum函数。
首先是算法。tcp checksum算法(或者icmp、udp、ip的checksum算法)是用one's complement(不知道中文叫啥)算法,以每2字节为单位,将数据加起来,最后的结果(还是2字节)再来一次按位取反,就是最终的checksum值,填到checksum区域即可。
然后是check的范围。简单地说,范围包括pseudo ip header + tcp header + tcp data。注意checksum区域本身也在范围内,所以发送方一开始要把那里置为零以方便计算。
pseudo ip header是利用ip header里的一些值来生成的,结构如下:
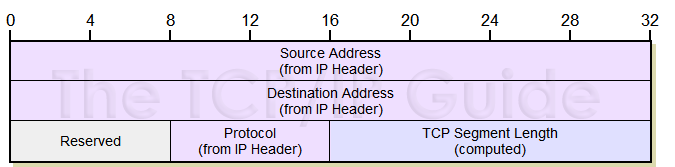
下面这张图就是整个需要进行checksum的内容:
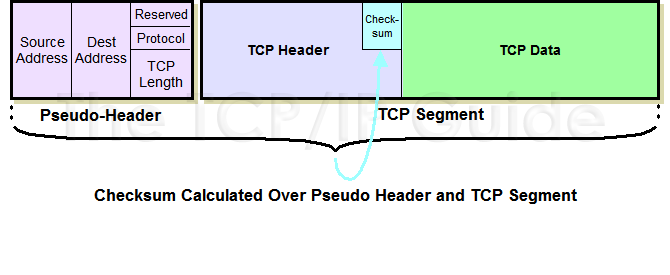
接收方收到数据包后的校验操作,用的是同样算法,结果为0则说明数据包在传输过程中没有损坏(想想为什么?)。
下面就是完整代码,记得在Linux下以root身份运行哦!打开wireshark抓包看看吧。
这里只实现了一个最简单的发包动作,连tcp三步握手都谈不上,监听、绑定操作也一概没有 = =
PS:本想改用Python3写,但是技术太水搞不定它的bytes, bytearray, string,只好用Python2了。
# -*- coding: utf-8 -*
'''
	A very simple raw socket implementation in Python
'''

import sys, socket
from struct import *

def carry_around_add(a, b):
    c = a + b
    return (c & 0xffff) + (c >> 16)

def checksum(msg):
    s = 0
    for i in range(0, len(msg), 2):
        w = (ord(msg[i]) << 8 ) + ord(msg[i+1])
        s = carry_around_add(s, w)
    return ~s & 0xffff

try:
    s = socket.socket(socket.AF_INET, socket.SOCK_RAW, socket.IPPROTO_RAW)
except socket.error , msg:
    print 'Socket could not be created. Error Code : ' + str(msg[0]) + ' Message ' + msg[1]
    sys.exit()

ip_source = '10.0.2.15' #本机IP
ip_dest = '64.4.11.42'	#也可以用域名:socket.gethostbyname('www.microsoft.com')

#填写ip header
ip_ver = 4			# ipv4
ip_ihl = 5			# Header Length =5, 表示无options部分
ip_dscp = 0			# 以前叫tos,现在叫dscp
ip_total_len = 0		# left for kernel to fill
ip_id = 22222			# fragment相关,随便写个
ip_frag_offset = 0		# fragment相关
ip_ttl = 255			# *nix下TTL一般是255
ip_protocol = socket.IPPROTO_TCP	# 表示后面接的是tcp数据
ip_checksum = 0			# left for kernel to fill
ip_saddr = socket.inet_pton(socket.AF_INET, ip_source)	# 两边的ip地址
ip_daddr = socket.inet_pton(socket.AF_INET, ip_dest)

ip_ver_ihl = (ip_ver << 4) + ip_ihl	# 俩4-bit数据合并成一个字节

# 按上面描述的结构,构建ip header。
ip_header = pack('!BBHHHBBH4s4s' , ip_ver_ihl, ip_dscp, ip_total_len, ip_id, ip_frag_offset, ip_ttl, ip_protocol, ip_checksum, ip_saddr, ip_daddr)


tcp_sport = 1000	# source port
tcp_dport = 80		# destination port
tcp_seq = 19890604	# 32-bit sequence number,这里随便指定个
tcp_ack_seq = 0		# 32-bit ACK number。这里不准备构建ack包,故设为0
tcp_data_offset = 5	# 和ip header一样,没option field
# 下面是各种tcp flags
tcp_flag_urg = 0
tcp_flag_ack = 0
tcp_flag_psh = 0
tcp_flag_rst = 0
tcp_flag_syn = 1
tcp_flag_fin = 0

tcp_window_size = 3000
tcp_checksum = 0
tcp_urgent_ptr = 0

# 继续合并small fields
tcp_offset_reserv = (tcp_data_offset << 4)
tcp_flags = tcp_flag_fin + (tcp_flag_syn << 1) + (tcp_flag_rst << 2) + (tcp_flag_psh <<3) + (tcp_flag_ack << 4) + (tcp_flag_urg << 5)

# 按上面描述的结构,构建tcp header。
tcp_header = pack('!HHLLBBHHH' , tcp_sport, tcp_dport, tcp_seq, tcp_ack_seq, tcp_offset_reserv, tcp_flags, tcp_window_size, tcp_checksum, tcp_urgent_ptr)

# 写点东西作为data部分(可选)
payload_data = 'wordpress.youran.me'

# 构建pseudo ip header
psh_saddr = ip_saddr
psh_daddr = ip_daddr
psh_reserved = 0
psh_protocol = ip_protocol
psh_tcp_len = len(tcp_header) + len(payload_data)
psh = pack('!4s4sBBH', psh_saddr, psh_daddr, psh_reserved, psh_protocol, psh_tcp_len)

# 创建最终用于checksum的内容
chk = psh + tcp_header + payload_data

# 必要时追加1字节的padding
if len(chk) % 2 != 0:
	chk += '\0'

tcp_checksum = checksum(chk)

# 重新构建tcp header,把checksum结果填进去
tcp_header = pack('!HHLLBBHHH' , tcp_sport, tcp_dport, tcp_seq, tcp_ack_seq, tcp_offset_reserv, tcp_flags, tcp_window_size, tcp_checksum, tcp_urgent_ptr)

# 最终的tcp/ip packet!
packet = ip_header + tcp_header + payload_data
# 发送出去
s.sendto(packet, (ip_dest, 0))
看效果的时候注意,Wireshark默认不检查TCP checksum的正确性,需要在其TCP Protocol的设置画面里把"Validate the TCP checksum if possible"勾上。
下面是我自己运行的结果,首先是IP header(点开看大图):
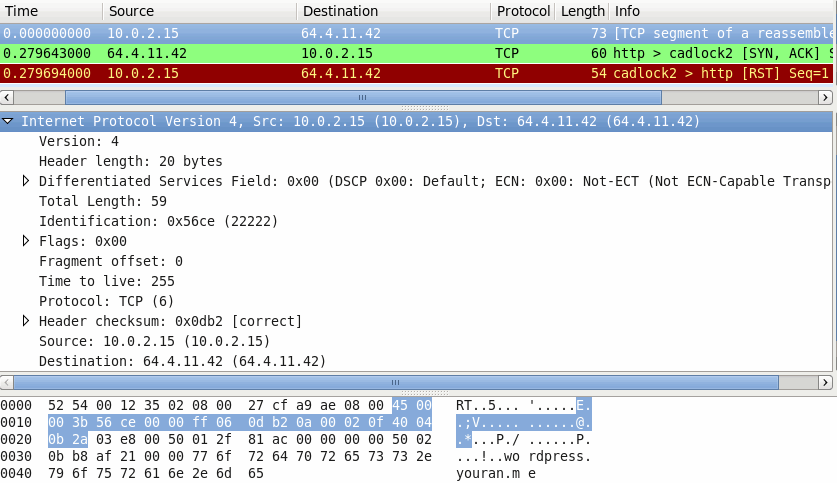
可以看到程序中设定的各种参数,而且内核自动把ip header的total length和checksum填好了。
然后是TCP header:
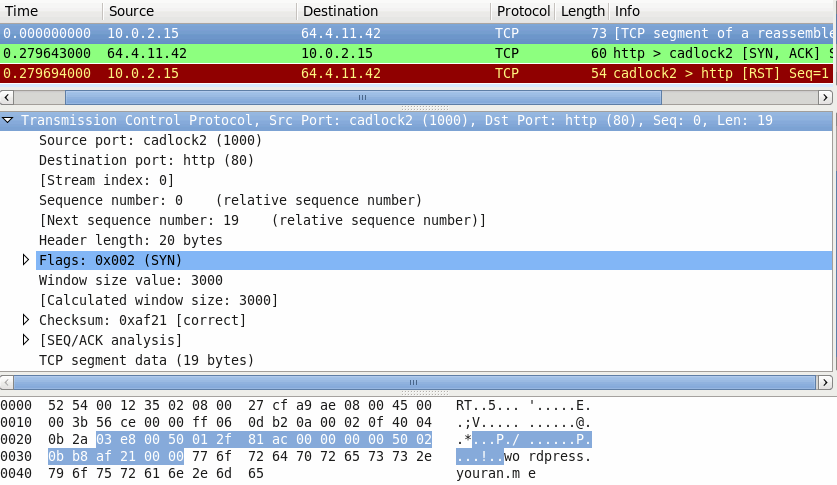
可以看到正如程序中flag设定的那样,这是一个tcp握手包。各项参数也正常,程序计算出来的tcp checksum(0xAF21)也是对的。payload data的长度也正常("wordpress.youran.me" = 19 bytes)
至此,一个最简单的raw socket通信已经完成。
再仔细观察Wireshark的抓包结果,会发现当我将SYN包发至微软网站后,微软正常回复了一个SYN+ACK的握手包,紧接着内核立刻向微软发送了一个RST包,直接中断了本次握手。本来以为用raw socket不会出现这个现象,看来光这样还不行,还得bind()+listen()本地端口才能通过内核的检查。
本文为悠然居(https://wordpress.youran.me/)的原创文章,转载请注明出处!
程序:SYN
微软:SYNACK
内核:纳尼?谁让你发出去的?RESET!
程序:…………
@youran
看来是要考虑丢掉Windows了
Good! 正在学习这些
可以的,一个小项目正好需要这个